
FIND THE FINISH THAT FITS
Hardie board-and-batten. Give the vertical rhythm a clear purpose.
Plan a James Hardie board-and-batten appearance around the windows, wall proportions and transitions on your own home. Compare the rhythm before choosing an accent area, then bring a defined panel-and-trim brief to Accent for assessment.
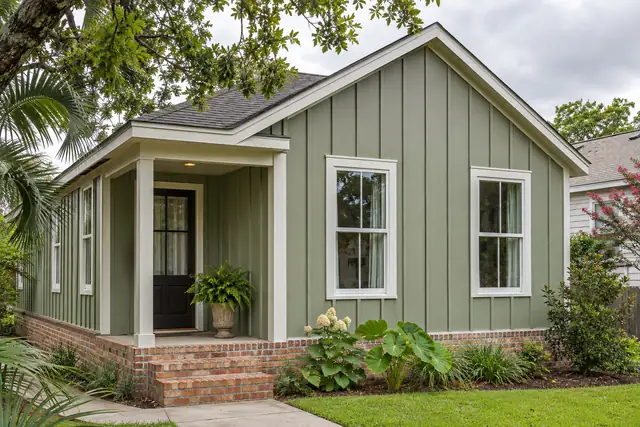
Understand the panel-and-batten look being discussed.
Board-and-batten describes an appearance with strong vertical lines. For the Hardie product combination discussed here, James Hardie shows Hardie Panel used with Hardie Trim batten boards. That distinction matters when comparing an inspiration image with an actual proposal: a general style name does not identify every component. Ask which panel, batten, corner and opening trim are included in the proposed arrangement. Keep product availability and finish choices open until confirmed for your project. This page focuses on the visual rhythm and scope of that combination. Use the parent installation page for the wider Hardie service request and the lap-siding guide when the main decision is a horizontal pattern instead.
Choose whether the vertical treatment leads or supports.
Decide which part of the house should draw the eye. You might be considering a full elevation, an entry wall or a gable above another siding pattern. Mark that exact area on a broad photograph and compare how it looks with the roof, porch and retained masonry. A small accent can feel deliberate when its boundary follows a recognizable architectural feature. Extending a vertical pattern across unrelated surfaces simply because the material is already selected can create a different result. Ask to review the proposed composition from the street as well as near the front door. Write down whether each area is included, optional or intended to remain unchanged so the appearance brief has a clear boundary.
Review batten rhythm beside the actual openings.
The spacing of vertical lines can make a wall feel calm, crowded or uneven around windows. Start with an elevation photograph that shows every opening and the wall edges. Compare the intended rhythm as a complete arrangement rather than approving a small sample of panel and one strip. Notice the narrow areas beside corners and between nearby windows. Ask how those places will be reviewed when the product layout is developed. An appearance sketch can communicate a preference for balanced fields or consistent rhythm, but the actual product arrangement and installation details must still be confirmed for the assessed wall. Do not turn an arbitrary sketch interval into a construction instruction before that review.
Give window and door trim its own decision.
Batten strips and opening surrounds play different visual roles even when they share a color. Look at how the vertical lines approach the window casing and where the door surround sits within the composition. Identify existing trim you hope to retain and photograph any unusual projections or later additions. Ask which pieces belong to the proposed panel-and-trim arrangement and which remain part of the existing exterior. A strong opening surround may be intentional, but it should not be the accidental result of combining two unrelated reference pictures. If windows are also changing, label them in the opening schedule and resolve that connected scope before the finished layout and surrounding trim are treated as settled.
Make horizontal breaks and adjoining materials understandable.
A vertical appearance still needs a plan for the top, bottom and sides of the area. Show where the proposed treatment meets the soffit, porch roof, masonry or horizontal siding. On a taller elevation, ask how any change of plane or horizontal division will appear in the selected system. The assessment should identify the relevant product guidance and details for those connections. Your part of the brief is to make the desired boundary and retained materials clear. Keep an image of the entire junction alongside the close-up detail. This avoids choosing an attractive field pattern while leaving the most visible transition to an assumption about what another material or trade will provide.
Compare color and texture without losing the vertical effect.
Place the panel and trim samples together rather than reviewing them on separate days. A subtle color difference can emphasize each vertical line, while a common finish can make the rhythm read more quietly. Compare both approaches against the existing roof, windows and brickwork. Use actual available sample references and keep the chosen panel and batten information together. Screen images can introduce color differences that are not present in the samples, so treat them as a way to explain direction. Record whether the proposal includes the selected finishing work and which surrounding surfaces remain. A coordinated palette is a series of named decisions, not simply an instruction to match a house shown online.
Price the defined composition and its preparation.
Ask for the affected elevations, panel product, batten components, opening trim and transitions to be listed with the work needed to prepare the existing wall. A proposal for a small gable is not directly comparable to one for an entire elevation. Removal, access, retained components, disposal and finishing can differ even when both proposals use the phrase board-and-batten. Keep uncertain concealed conditions and the approval process for additional findings visible in the discussion. Where another exterior scope meets this work, identify who confirms the shared boundary. Use the main siding page to discuss the broader project while this design record keeps the vertical treatment and its included areas easy to compare.
Check the design with a simple elevation record.
Create one record for each proposed area with a wall label, wide photograph, intended accent boundary, panel reference, batten reference, finish and retained opening list. Add an unresolved-decision column rather than filling a gap with a guess. An illustrative entry could describe an entry gable with vertical lines, retained white window surrounds and a clear trim band at the change to horizontal siding. It would still need product and property assessment before becoming a final scope. Keep a dated version after the selections are confirmed. If the boundary moves or a window changes, update the record so the next discussion does not rely on an outdated sketch.
Plan the review and care records from the beginning.
Before work is agreed, ask how final selections, changes and the project review will be recorded. Review the appearance from ordinary viewing positions using the same elevation labels as the proposal. Keep the actual product and applicable warranty documents with the finish references. James Hardie provides current care guidance for its siding; use the instructions relevant to the specified finish rather than treating every painted exterior in the same way. Explain any concern you cannot identify during the handover instead of experimenting with an unconfirmed treatment. A clear panel-and-batten record helps future care, a later exterior phase and any question about the original selection start from the arrangement that was actually agreed.
GOOD QUESTIONS. CLEAR ANSWERS.
Your hardie board-and-batten planning questions.
Use these answers alongside the selections and conditions for your own property.
YOUR PROJECT · YOUR NEXT STEP
Ready for new siding?
Share your project and city or ZIP. Accent can discuss the existing space, your priorities and the details needed for an estimate.
- Share your project
A short request. Phone or email. No account needed.
- Review scope and estimate
Discuss the assessed work, materials, preparation and exclusions.
- Approve and plan the work
Confirm the agreed scope and installation arrangements with Accent.
Your request starts a conversation. You approve the work before installation.
