
ACCENT HOME IMPROVEMENTS
Estimate photographs. Show the area. Then show the detail.
A few well-labeled views can explain the property more clearly than a large camera roll. Build a simple photo set that connects the requested change with the surrounding siding, openings and patio.
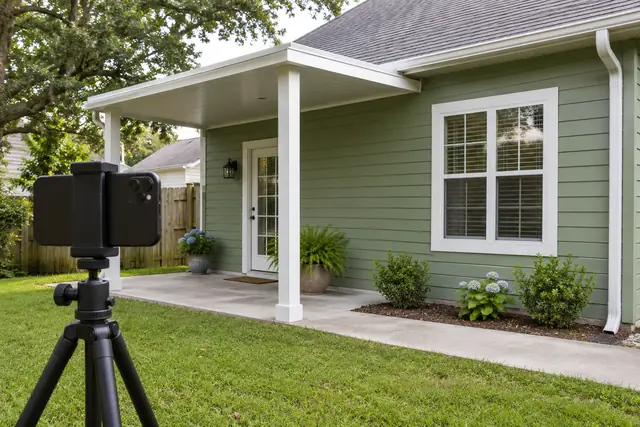
Start with a wide view that explains the place.
Take an ordinary wide photograph of the area you want discussed from a safe position on your property. Include enough of the house and ground-level surroundings to show where the requested work belongs. For a siding enquiry, the wall, nearby openings and a recognizable corner help establish context. For a patio enquiry, include the house doorway, existing floor area and connection to the yard. A wide view gives a later close-up somewhere to belong. Keep the original file and identify the area with a short label. The purpose is a useful property record; a dramatic angle or a very tight crop can make the image less helpful when the person reviewing it is unfamiliar with the home.
Add a relationship view for connected features.
Where the question involves more than one component, take a view that shows how those features meet. A window within a siding wall, a cover beside a roof edge or a doorway next to an outdoor route can need more context than separate close-ups provide. Name the features using the same simple labels as the written enquiry. If an existing item is to remain, say so in the caption or on a marked copy. This relationship view can make the household’s request easier to understand without drawing a construction detail. Leave hidden connections and suitability as questions for assessment. The photograph records what is visible and how the parts of the property are arranged at that visit.
Use close details to answer a named question.
A detail photograph is most useful when it has a purpose. Label it with the wall, opening or patio area shown and the specific observation it records. You may be showing a finish, an existing edge, an identifying label or a visible concern. Keep the associated wide view in the same set so the location remains clear. Avoid making a diagnosis solely from the close-up. A dark mark, gap or irregular surface can prompt an assessment question without establishing its cause. If the first photograph is unclear, explain what you were trying to show and ask whether another view would help. This creates a practical exchange instead of collecting many similar images whose intended meaning is never stated.
Give every view a short, consistent label.
Use ordinary names such as driveway-side wall, rear door or patio edge. If several windows are involved, add a simple identifier such as W1 and use it in the written notes as well. Include the date and any relevant context, such as whether a door was open or a surface was wet at the time. A sequence number can keep a wide view and its details together without requiring a complicated naming system. Preserve the originals and put arrows or notes on separate copies. A label should help someone identify the scene, not claim an unverified product or construction condition. The same clear labels can later support the opening schedule or a service-specific project brief.
Choose clear conditions and ordinary viewpoints.
Use daylight when it helps show the feature, and avoid aiming directly into bright glare if a different safe position is available. Review the image on your screen to see whether the intended area is actually visible. Keep important edges in the frame and make sure a closer view still has enough context to be recognized. A photograph from the usual patio chair or doorway can help explain a household-use question. Note unusual weather or lighting that affects what the image shows. You do not need to enter hazardous weather, climb onto a roof or move into an unsafe position to complete a photo set. Mark the missing view as an assessment question instead.
Keep property facts distinct from visual references.
Your current-condition photographs and inspiration images serve different purposes. Put them in separate groups and identify the feature you like in each reference. A picture from a gallery or an illustrative scene can communicate an appearance preference, while the actual property set records the place being assessed. Keep altered images identified and preserve the unedited originals. Avoid removing an inconvenient retained item or changing a finish color in the image presented as the current condition. If a marked copy highlights the requested area, label the marks as notes. This lets the assessment use both the household’s preferences and the visible property facts without confusing one kind of image with the other.
Patios →
Share only the useful part of the household record.
Review the set before sending it. Choose the views that explain the enquiry and avoid including unrelated documents, personal screens or private household information in the background. Crop a sharing copy when needed while keeping enough property context and preserving the original. Tell Accent what question the set is intended to support. If a particular image is difficult to explain, add a short caption rather than expecting its meaning to be obvious. A concise set is easier to discuss in a call or form enquiry, especially when it uses the same area names as the message. Keep a copy of the exact images sent so follow-up questions can refer to the same numbered views.
Build a small photo package around the assessment.
Start with a wide view, a relationship view where relevant and a few named details. Add the property location, project goal and retained features in the enquiry. The photo-review brief can organize a request centered on images, while the estimate-preparation guide holds the wider starting information. Ask what further views would be useful after the initial set is reviewed. Photographs can improve the conversation, but they do not replace the property assessment or establish final dimensions and hidden conditions. Keep the set together as the enquiry develops. It gives the household and Accent a common visual reference for the particular wall, opening or outdoor area being discussed.
GOOD QUESTIONS. CLEAR ANSWERS.
Your estimate photographs questions.
Use these answers alongside the assessed conditions and choices for your own property.
YOUR PROJECT · YOUR NEXT STEP
Turn your project ideas into a clear next step.
Share your project and city or ZIP. Accent can discuss the existing space, your priorities and the details needed for an estimate.
- Share your project
A short request. Phone or email. No account needed.
- Review scope and estimate
Discuss the assessed work, materials, preparation and exclusions.
- Approve and plan the work
Confirm the agreed scope and installation arrangements with Accent.
Your request starts a conversation. You approve the work before installation.
